Download the 7-step guide:
The new 3.1 All-In-One TBS Report is divided into 7 steps. In the next few days, we will show you how easy it is to use the new report in daily clinical routine.
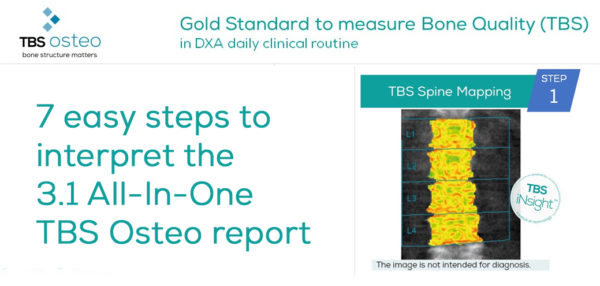
STEP 1 of 7 – TBS spine mapping
Check your patient positioning and the bone mask. The TBS mapping is the local visual display of the TBS values for each pixel of the DXA image. A low TBS value is represented in red; a high TBS value is represented in green and a medium TBS value in yellow. It is intended to check patient positioning and the bone mask
- Why is this important?
- Patient positioning and bone mask outlining are key for an accurate TBS computation, especially for patient monitoring.
- What to do?
- L1-L4 vertebrae are clearly separated at intervertebral spaces.
- Bone edges include all relevant anatomy and exclude the osteophytes.
- Vertebral fractures or artifacts are excluded.
Download the 7-step guide here:
As a reminder the main features of the 3.1 All-In-One TBS Osteo report are:
- Completely new and intuitive design to simplify the interpretation of the BMD and TBS exam.
- Bone health report – All-In-One: TBS and BMD results in one report
- New BMD T-score adjusted for TBS
- Fracture risk grid – A visualization of BMD and TBS combined assessment
- Automatic and editable conclusion developed by international experts to communicate easily with referring doctors
Feel free to share with your colleagues, as it helps identify more patients at risk for fracture. If you have questions, contact us at support@medimapsgroup.com – we will gladly help you.
Click here to follow us on LinkedIn.
You can find more information on all 7 steps below: